No-Code Data Pipelines: How to Migrate Customer Data
Sharing data is essential for successful collaboration between your business and your customers, partners, and third parties. Data pipelines help facilitate these exchanges by moving data from one system (source) to another (destination). Although companies have traditionally relied on manual processes in place of data pipelines, they require lots of internal time and resources to build and maintain.
Most ETLs are designed to move internal data between internal systems (Salesforce to Snowflake), but they're not a great solution for migrating customer data in your application.
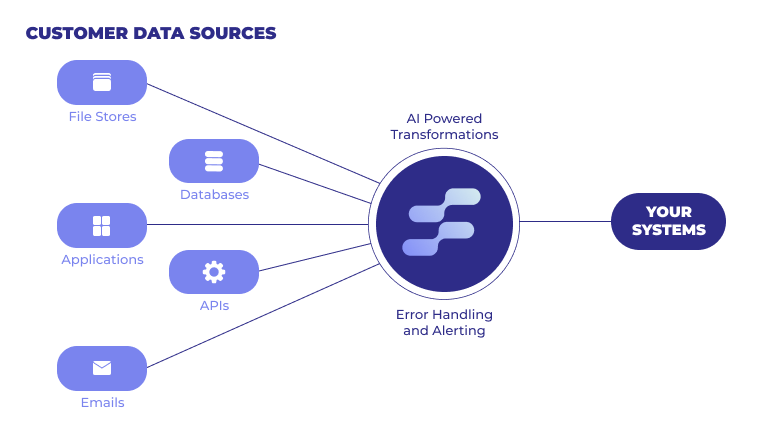
Osmos Pipelines automates the data migration process to enable a smooth, continuous, and secure flow of data between systems. As data travels through the pipeline, it's transformed to fit the your target system's schema so you only ingest clean, usable every time.
Whether you're migrating a new customer to your POS or scheduling recurring data ingestion, Osmos Pipelines helps your teams cleanup and ingest customer data without writing code.
In this post, you'll discover how to build Osmos Pipelines to migrate your customer's data by automatically mapping, transforming, and ingesting the data without writing any code.
How to Migrate Customer Data with No-Code Data Pipelines
1. Connect to the Source
As you probably guessed, a source is where data comes from, whether it's a data warehouse like BigQuery, a file storage service such as Google Drive, or a CRM like HubSpot. Data needs to be pulled from a source, transformed to fit your destination's schema, and ingested into the system to be usable.
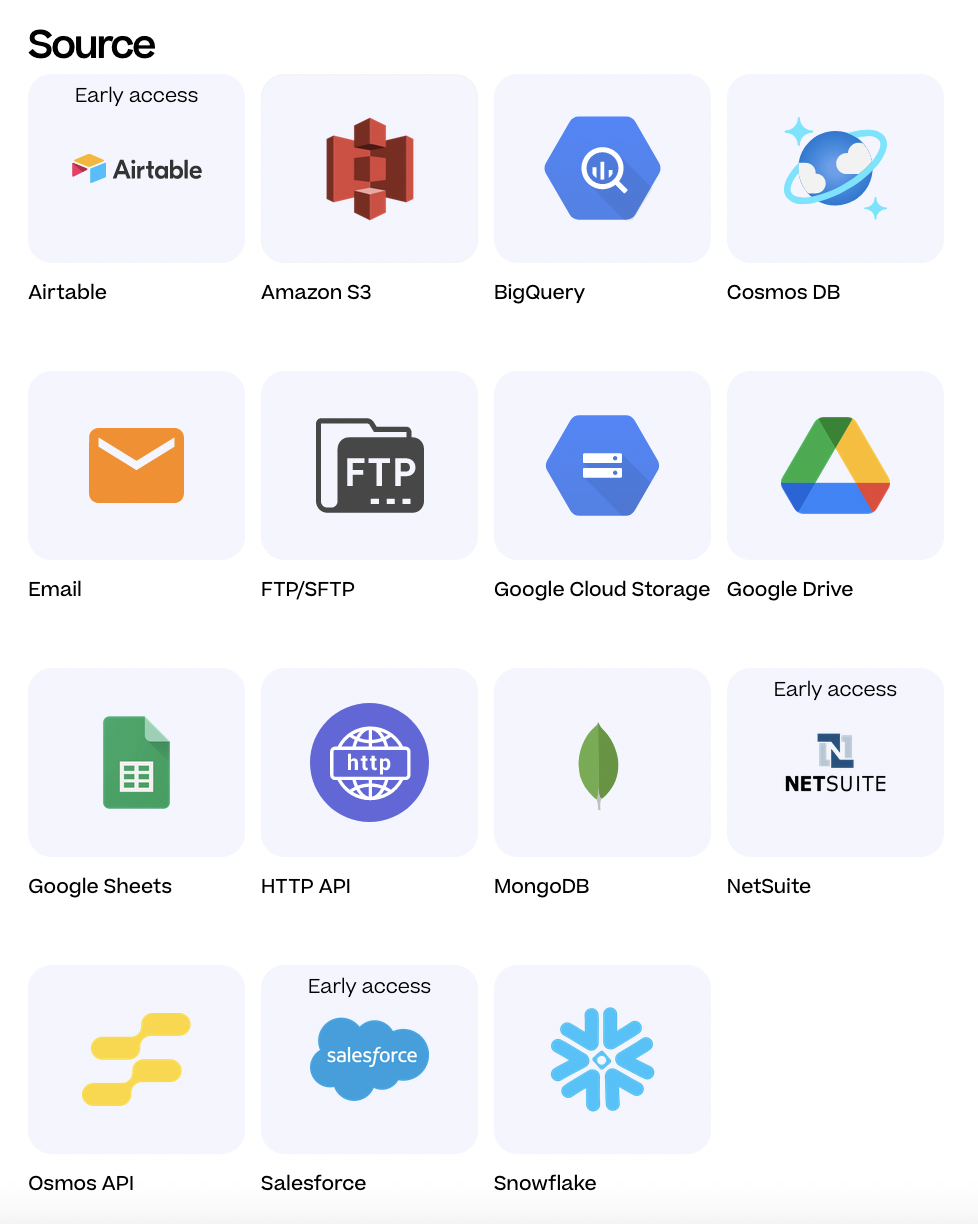
Here are the prebuilt connectors and APIs you can currently use to build an Osmos Pipeline.
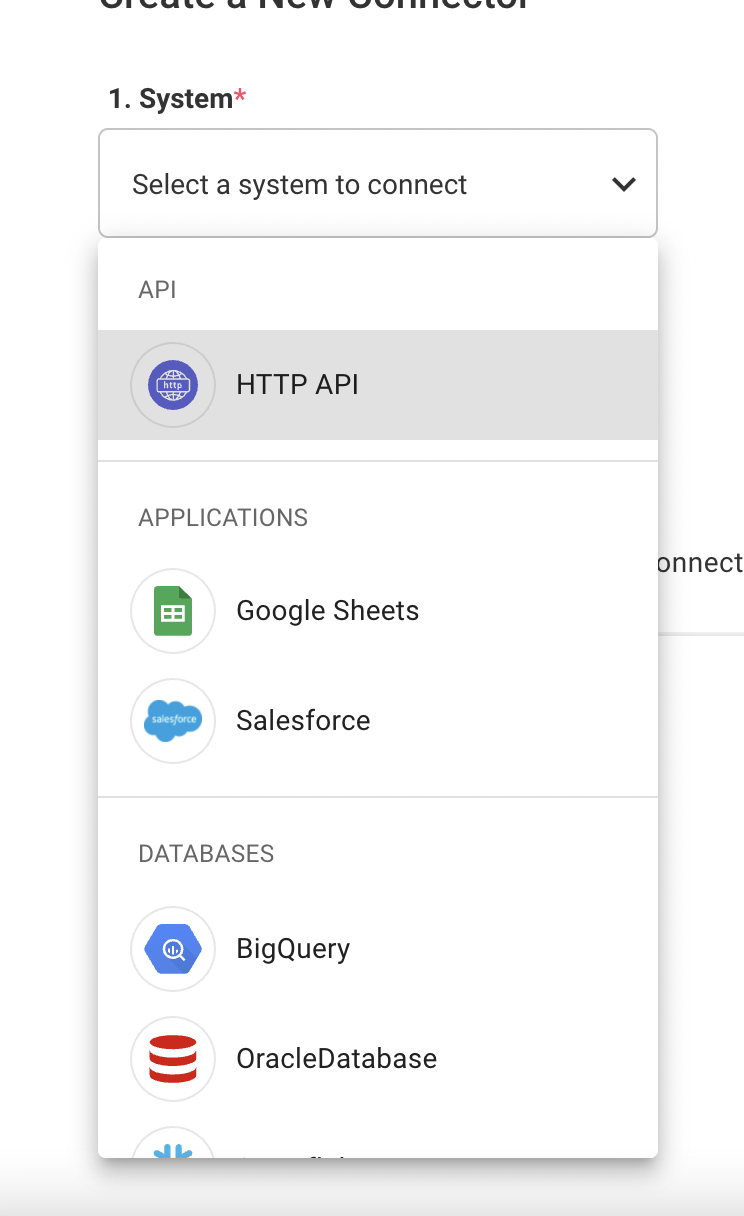
The first step to creating an Osmos Pipeline is selecting the Source Connector. This connector provides access to the data within the specific source system. You can set up a New Source Connector or use an Existing Source Connector.
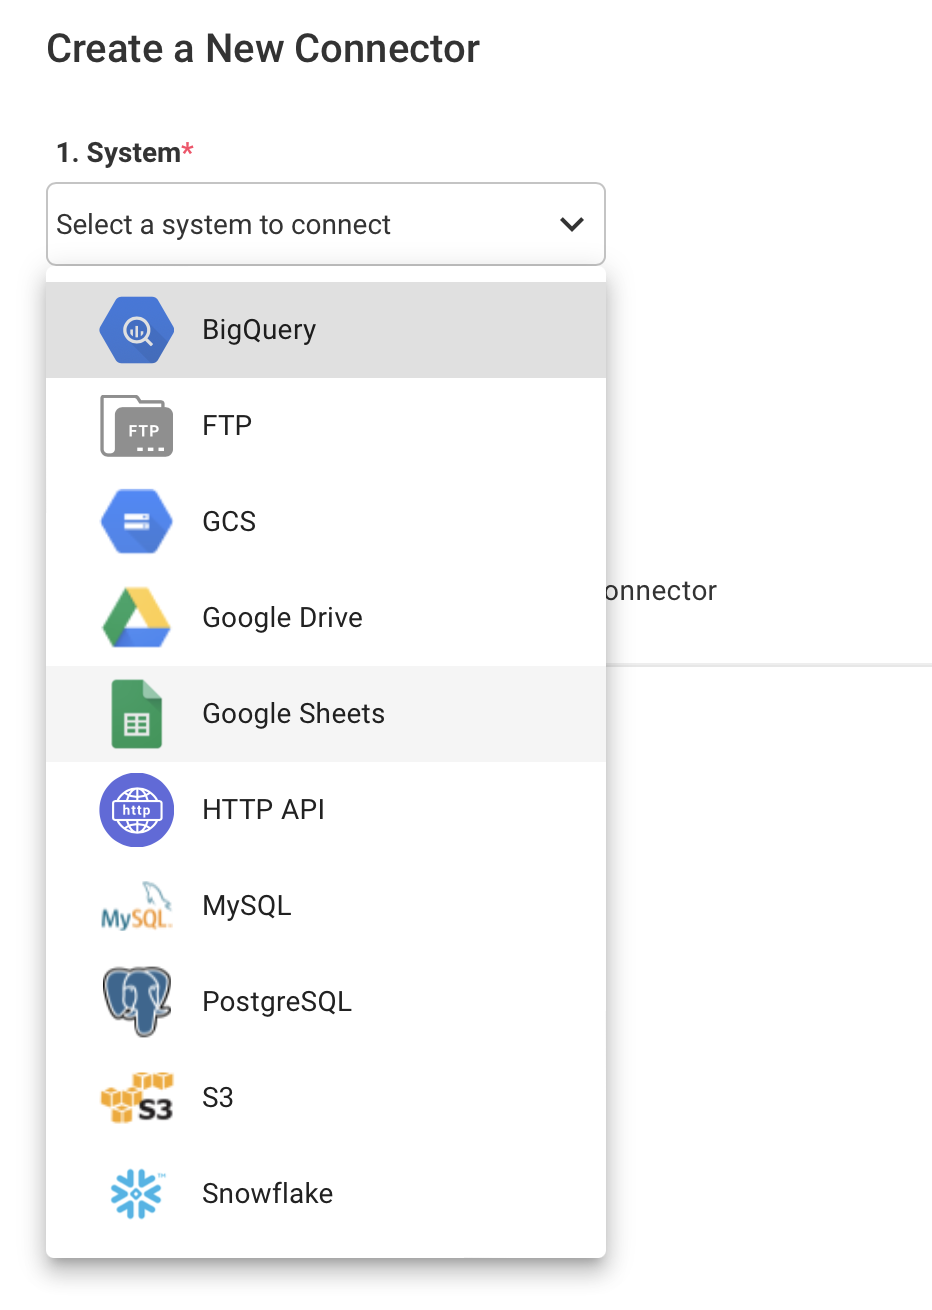
To Create a New Source Connector
Click the + New Connector button above the list of connectors in the Osmos platform. After clicking, you'll be directed to the Create a New Connector page. Once there, click on the dropdown menu, and choose the system for your Source Connector.
Next, set-up the new Source Connector by filling out the required fields, such as Name, Host, Port, Username, and Authentication. If needed, you can also use advanced functions, such as filtering source data, stripping out null characters, and choosing a deduplication method to support all of your data onboarding scenarios.
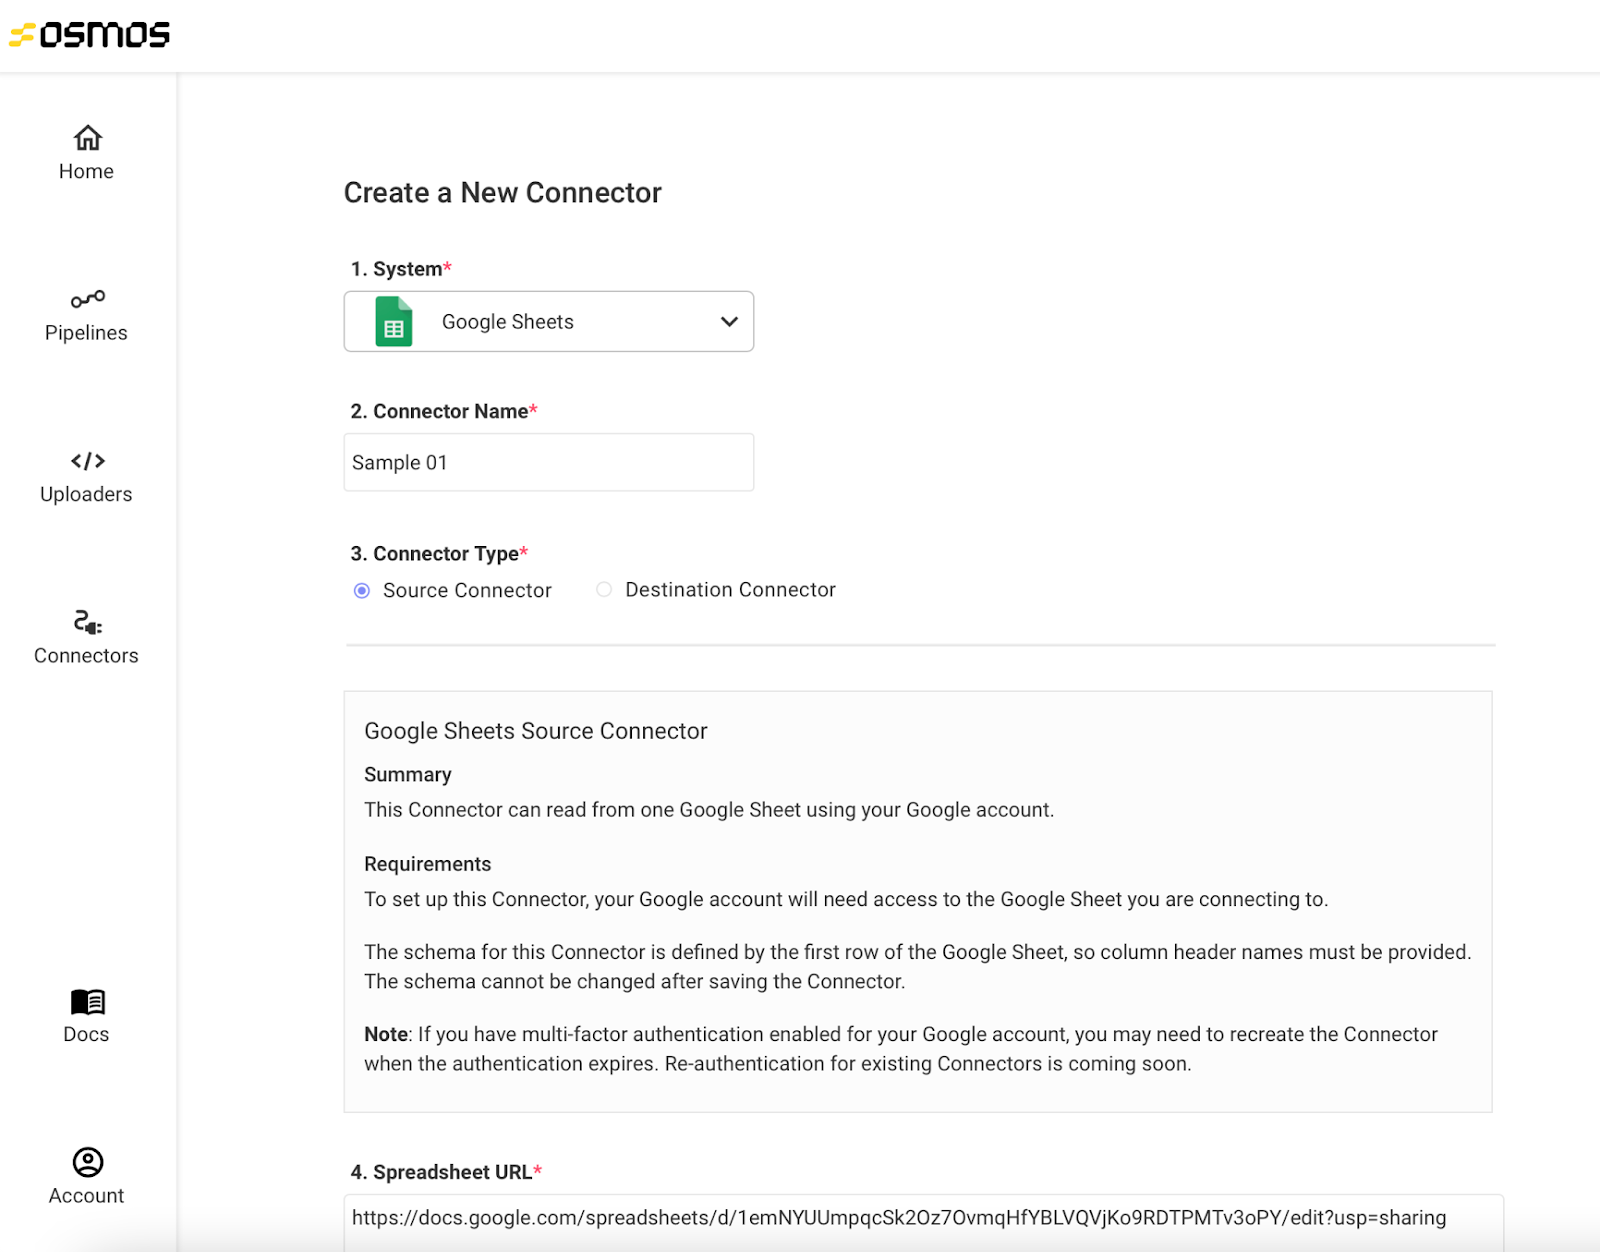
After configuring your new connector, test and save it. If it passes, you'll be directed to the list of source connectors. Your new connector will be available in the list – simply select it to move on to the next step.
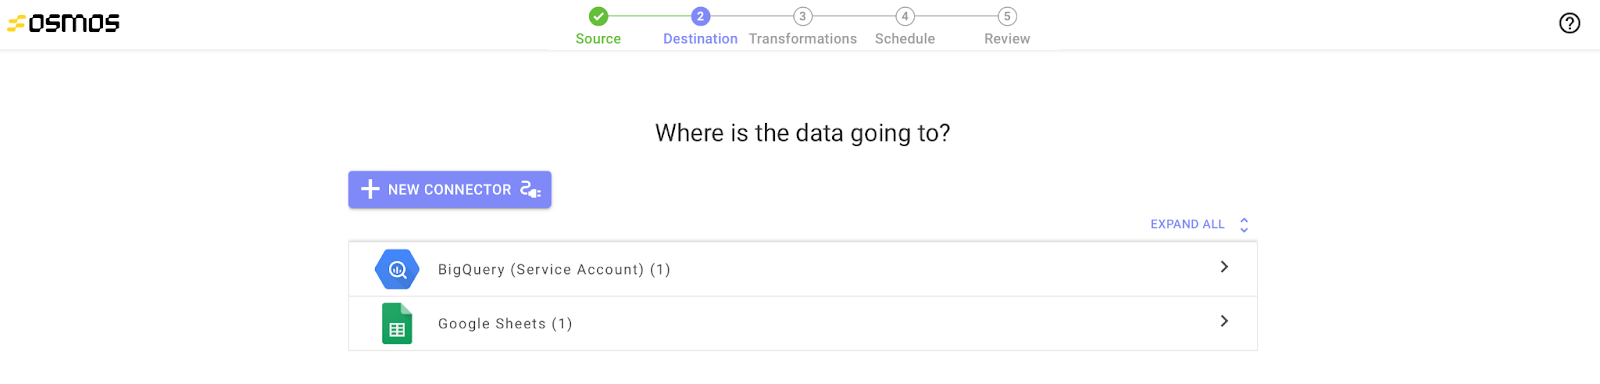
2. Connect to Your Destination System
To send data seamlessly between two systems, you have to connect the source connector you've just created to a destination connector. These connectors give the systems access to one another, so data can be read, transformed, and ingested.
Now that you’ve set up your source connector, you'll be prompted to select a destination connector. Osmos supports numerous databases, applications, and file storing systems, or you can take data directly to your APIs via our destination connectors.
To start, you can create a new destination connector or use an existing destination connector.
To Create a New Destination Connector
Start by clicking the + New Connector button above the list of connectors.
Next, you'll be directed to the Create a New Connector page. Next, choose the system for your new connector using the system dropdown.
Once you've selected the destination system, you can design, test, and save the schema for the Destination Connector. Find detailed instructions for each of our supported systems here. After saving the connector, you'll be directed back to the list of Destination Connectors. This new Connector is now available in your list, so click on it to proceed to the next step.
After choosing a destination connector, you're ready to map and transform the data to match your system's schema.
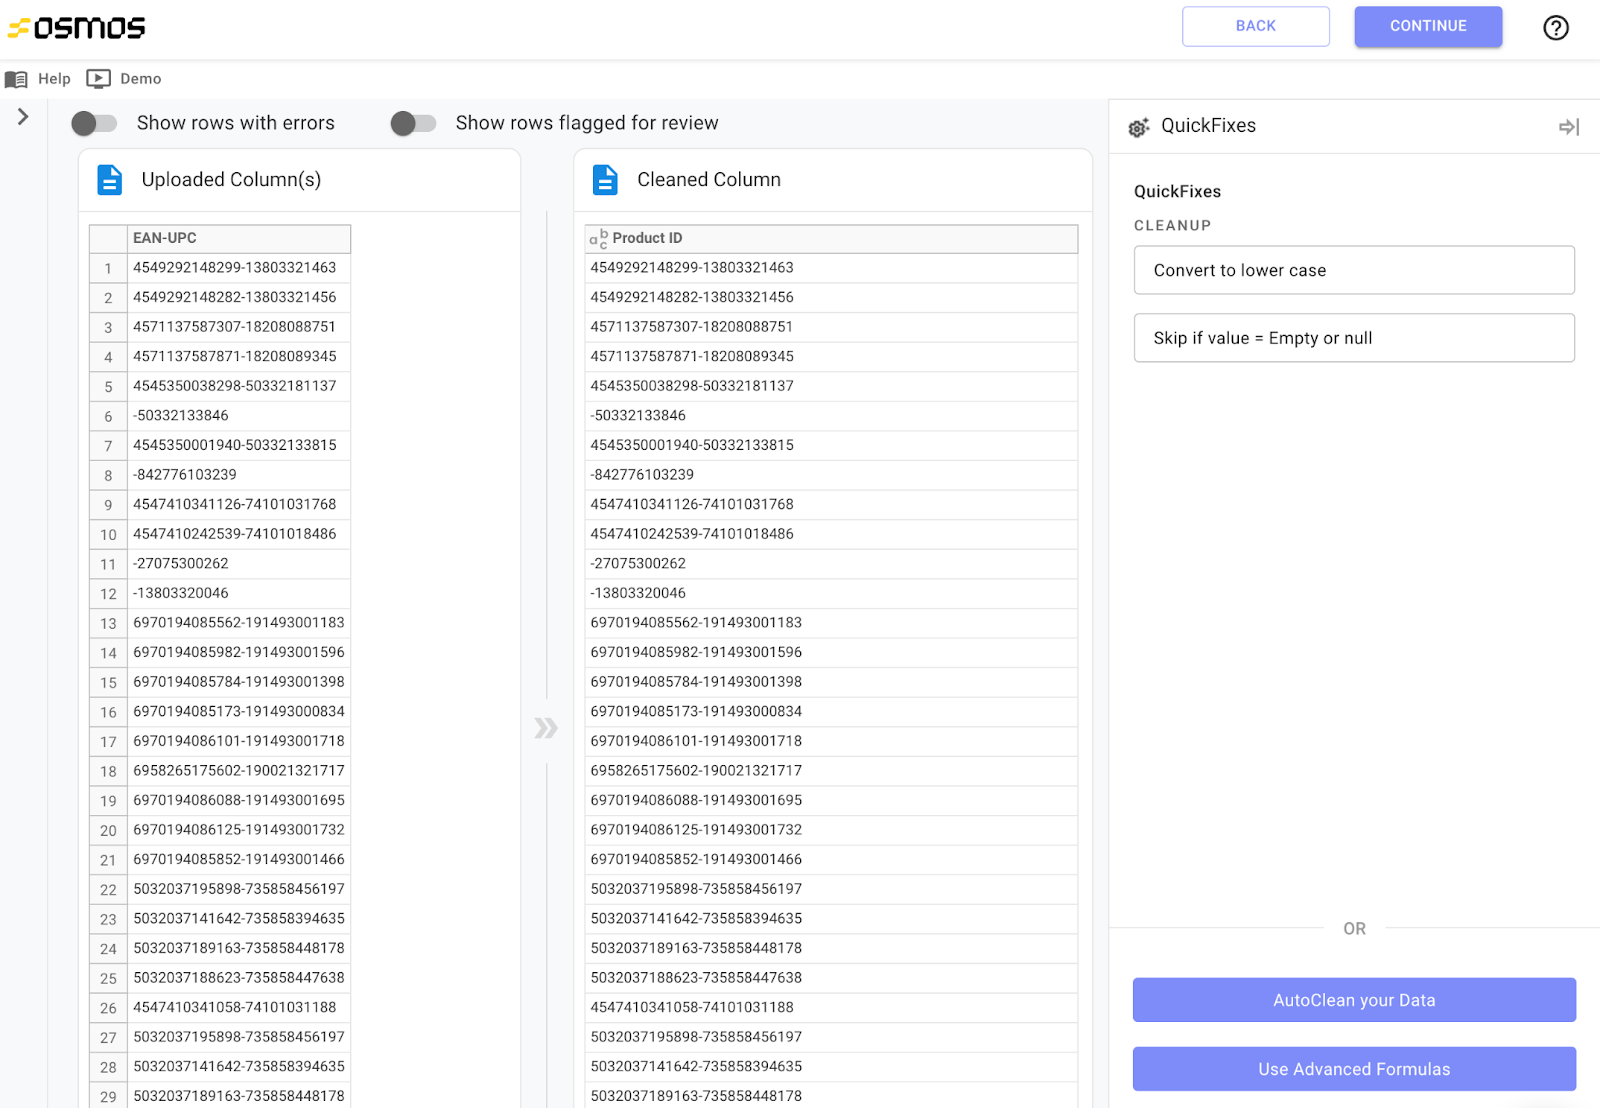
3. Map, Validate, and Transform Data
Now for the fun part. Gone are the long days of wrangling messy data. This step is where we map the relationship between the source and destination columns so the data matches the destination schema. Now onboarded data is easily ingested into the destination system - clean, structured and ready to use thanks to our no-code data transformation engine.
You'll quickly clean data in the Column Mapping panel using tools such as column mapping, QuickFixes, AutoClean, SmarFill, formulas, and single cell edits.
Once you’ve located the panel on the left side of the screen, select the column(s) that contain the data for the first destination column listed. These fields can include pertinent information such as order date, product ID, name, price, address, and so on.

Clean up and modify data faster than ever. If you want to resolve errors in the destination column, click on any cell in that column to open the data cleanup panel. Here, you can access the following tools:
- QuickFixes - One-click, data-cleanup buttons that allow you to easily clean up your data for the most common scenarios for that data type (e.g. Date, Text, Numeric, etc.).
- SmartFill - Simple to use AI-powered data cleanup that learns and detects patterns from your examples to parse and clean data.
- Formulas - Spreadsheet-style formulas that allow you to clean up your data.
Review the available options in the data cleanup panel, and choose the option that best fits your needs for each column.
Review the available options in the data cleanup pane.
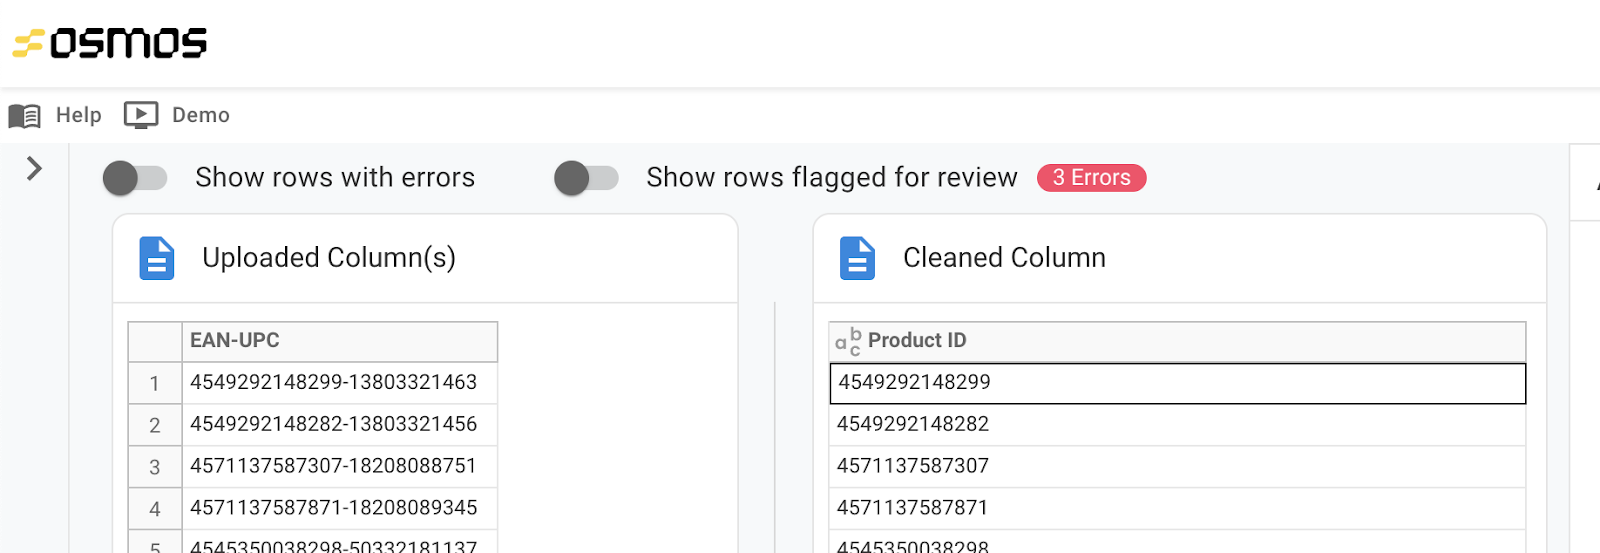
After you map a source column to a destination column, you'll see the data that corresponds to the selected columns to the right of the mapping section. When you select a different output column in the mapping section, the section to the right will update to display the corresponding data for those columns.
Use the toggles at the top of the page to instantly filter for rows with errors and/or rows flagged for review to resolve any issues with your data.
Once you've repeated the above tasks for each of the required source columns (and any optional columns you want to include in this Osmos Pipeline), move to the next step.
4. Schedule the Data Pipeline
After mapping and transforming the source data, you'll be taken to the Osmos Pipeline Rules page where you'll name the pipeline and set the rules. Automate your pipelines to run on your terms.
To do so:
First, Provide a Name.
Next, Provide a Description (optional) for your pipeline.
Finally, Select one of the two options for your pipeline Schedule:
- Select No scheduled runs if you want to manually trigger each pipeline run.
- Select Custom schedule if you want your pipeline to run automatically at a specific frequency. If you select this option, select the time interval (minutes, hours, days, or months) and how often you want the pipeline to run.
Once you've finished this step, click Continue to proceed to the next step.
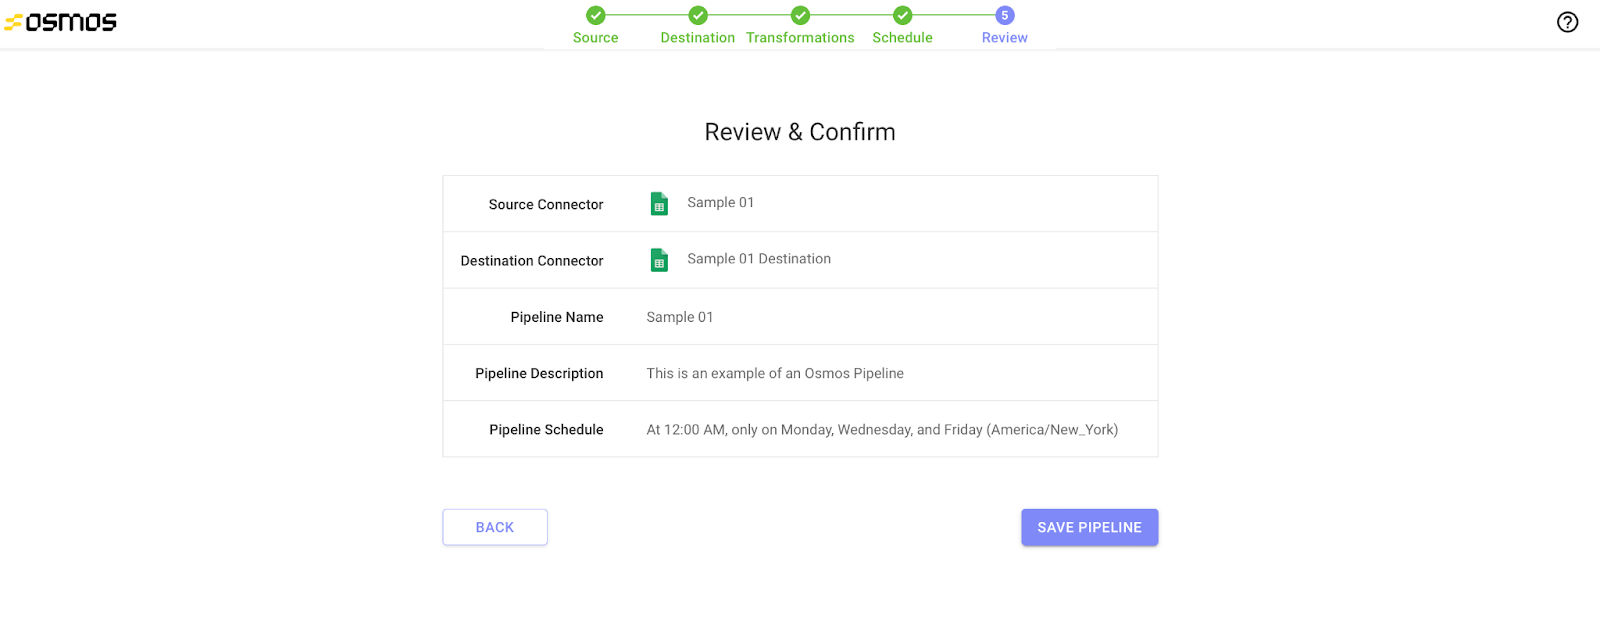
5. Review and Confirm
A final review ensures the details for your pipeline are correct. To make any changes, click Back to return to the previous steps. If everything looks accurate, click Save Pipeline.
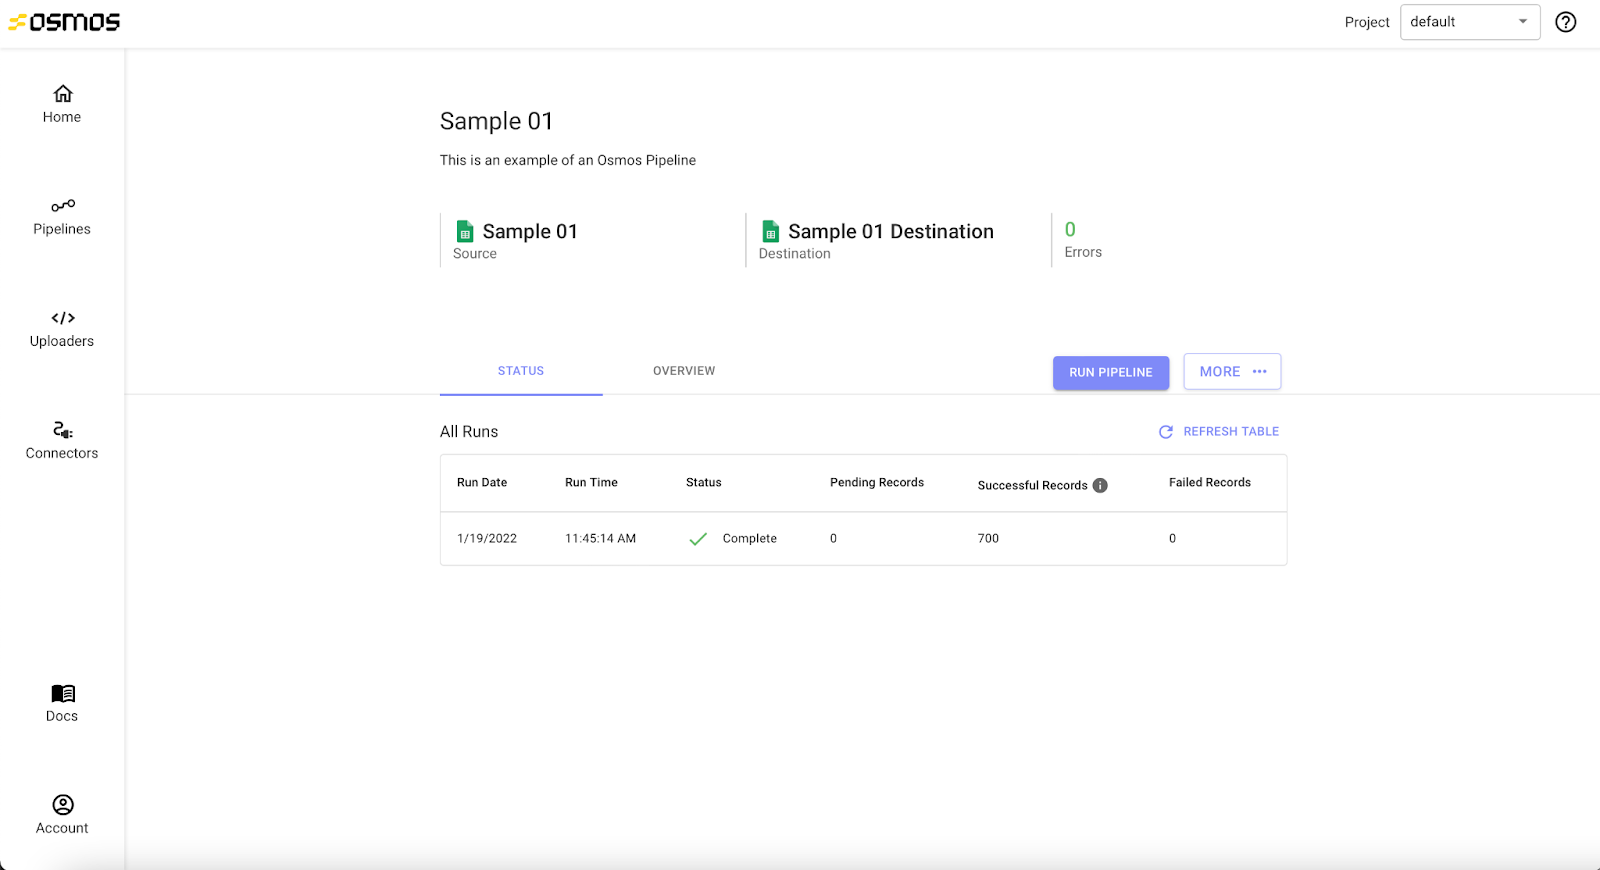
Scheduled the Data Pipeline
After saving a scheduled Osmos Pipeline, you'll be directed to the dashboard for your new pipeline. Your pipeline will automatically run according to the schedule you set. If you want to manually trigger it to run outside of the scheduled runs, you may click the Run Pipeline button.
Unscheduled Pipeline
After saving an unscheduled pipeline, a prompt asks if you would like to run the pipeline. To do so, click Run Pipeline. You'll be directed to the detail page for your new pipeline. To see the details about your pipeline runs, click on Jobs tab.
If you don't want to run the pipeline, click Don't Run. You'll be directed to the detail page for the new pipeline. From this page, you can manually trigger the Pipeline to run by clicking the Run Pipeline button.
Automate customer data migrations with no-code data pipelines
With Osmos you are in full control of your data onboarding. Companies that want to make data imports as fast and efficient as possible look to our no-code data pipelines. It's perfect for businesses that need to:
- Control how customer data is ingested. Ingest clean data from your customers and partners every time
- Control how frequent the data is imported. Osmos Pipelines can be set up on a recurring schedule or manually triggered to run at any time so you never miss a dataset.
- Control the customer experience. Automated data imports help you provide a premium customer experience by streamlining operations and communication.
Ultimately, automating the data migration process with Osmos Pipelines gives your internal teams more time to create new products and deliver an excellent customer experience.
Go From Co-Pilot to Auto-Pilot
Discover our fully-autonomous AI Data Wrangler on Microsoft Fabric
Talk to an expert


%201.svg)